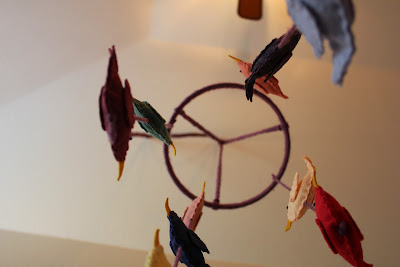
For this week's Tuesday Crafties I shared the mobile I made for the little miss's room. Now I thought I would share how I made it so you could make your own!
To make your own you'll need:
the inside hoop of a needle point hoop
half a skien of yarn
various colors of felt
embroidery thread
craft glue (I like FabriTac)
a sharp pair of scissors
and stuffing (not pictured)
To start I took the hoop and placed a thin dot of glue on the inside lip to tack my yarn down. Then I wrapped the entire hoop in the purple yarn I had chosen. When you have made it all the way around, secure the finishing end with another dot of glue and let dry. To keep from holding the loose end down while it dries I used a small plastic clothes pin to hold it securely until it was done.
Next, while the glue is drying cut your mobile shapes out of the colored felt. I chose birds and free handed the first one and then used it as the template for the rest. You could easily do circles or flowers or another kind of animal for yours. Cut out two identical shapes for each color.
Here are my bird bodies and wings above. After you cut out your shapes, choose your thread. At first I thought about doing contrasting colors for the stitching but then decided to go tone on tone. I also chose dark brown and dark blue thread to do the eyes. First I used a double French knot stitch to make the eyes on each body. Next I glued the beak on to the inside sides of one of the bodies. Then I stitched up the body, making sure that I stuffed the stuffing in before finally closing it up. After that I put a little stitch around the wings and glued them on as well. This step takes the longest because of the all the hand stitching, even though I consider myself pretty quick. To save time you could sew them on a machine, I just like the folksy sort of look of the hand stitching and thought it contributed to the overall look I was trying to accomplish.
I tried to do them in as many colors and I could and to try to balance light and dark, bright and muted colors. I think they turned out so cute!
I set the cute birds aside and returned to my yarn hoop to create the hanging apparatus. To make the hanging part I took the same yarn I used to wrap the hoop and measured out nine pieces of yarn roughly five yards long each. (I chose a really long length because we have high ceilings and I wanted a little extra to drape when I hung it) I divided the yarn into groups of three, and folded them in half, so I had six strings. I then tied them to the hoop 1/3 of the way around.
With each set of six strings I divided them into threes and braided the yarn about 12 inches. I did this for each set. I used a chip clip to hold the braid and keep it from unraveling while I braided the next. When I had them all braided, I gathered them together and held the whole thing up so I could make sure the hoop was level. Once I had it level I tied all the yarn into one big knot.
Then I took the large group of yarn and redivided it into thirds and braided the rest of the two and a half yards or so. When I only had about 9 inches of yarn left I tied the whole thing off and trimmed the yarn evenly to create a tassel at the end.
To affix the birds to the mobile frame I first strategized to stagger the birds so that they would alternate light and dark, bright and muted and not place two that were similar in color too close to each other. I also sewed together ten birds so i decided to hang two sets of three and two sets of two to create a staggered look as well. I then took a quilting needle (read needle with an eye large enough to get yarn through) and used it to thread the yarn through the center of the birds. I tied the yarn off under the last bird and then tied the top of the strand of birds to the hoop.
Ta-da! Here is the final project.
Pretty cute huh? I thought about adding a few strands of tinier birds through out but for now this is perfect! And the nice thing about it is it's soft so in the night if bump my head on it it doesn't hurt and it also doesn't set off a bunch of noise and lights like some mobiles!
If you try this project I would love to see how you adapt it and make it your own! If you don't want to give it a try but want one, shoot me a message and I can make you one.


No comments:
Post a Comment