Happy Monday! Hope you had a great weekend. Do you ever sit down to write on Mondays and honestly can't remember a thing about your weekend? That was me this morning. We had a good weekend--grabbed dinner with friends, rented a movie or two to get caught up for awards season.
Last week I shared little miss's Valentines inspired heart headband and today I wanted to share a little tutorial so you can make one of your own!
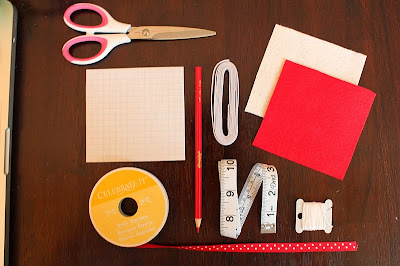
To make your own headband you will need:
Red and white ribbon. I got this spool as a gift from my aunt (does she know the way to my heart or what?)
Measuring tape
White elastic (the softer the better--this is for those soft baby heads!)
Two 4" by 4" pieces of felt one in red and the other white
White embroidery thread
Fabric glue (not pictured)
Small binder clips, chip clips or clothes pins (not shown)
Fabric glue (not pictured)
Small binder clips, chip clips or clothes pins (not shown)
A scrap of graph paper and a pencil (optional)
First you will need to know what size baby head you are working with. You can do this either by measuring (which can be tricky--they are very wiggly subjects) or what I prefer to do is use the head measurement from our last doctors's visit and add an eight or a quarter inch to that measurement for each month past the visit.
Now, measure and cut a 4 inch piece of elastic.
After you have done that, subtract 3.5 inches from your measurement. That is the length you need to cut two equal in length pieces of ribbon.
Now, this is the trickiest part (and it not that tricky!)...lay one strip of ribbon face or polka dot side down. Run a moderate strip of glue down the entire length of the ribbon adding extra glue on the last quarter of a inch at each end.
Next take the other piece of ribbon you cut and lay it face down putting glue only on the last quarter inch of each end.
Now take the elastic and lay the last quarter inch of the elastic on the last quarter inch of the first ribbon. then fold the second ribbon over on the elastic and first ribbon, pressing along the way and removing any excess glue with your finger.
When you get to the last quarter inch of ribbon bring the other end of the elastic around and place it between the two ribbons and press firmly.
Now take your binder clips or clothes pins and clamp them where the ribbon and elastic meet. Set aside to dry.
While the headband is drying cut a heart shape out of your read felt. I free handed mine but if you aren't great at free handing use a piece of graphing paper to sketch out a pattern.
Using the red heart as a guide, cut two hearts out of the white felt that are an eight of an inch larger all the way around.
Using the embroidery thread and a straight stitch stitch your read heart however you would like.
Take the read heart and glue it onto one of the white hearts. After the headband is finished drying take the two white hearts and place glue on them and press them around the ribbon just off center. Wait to dry and then try it on your little model!
I would love to see how yours turned out!


No comments:
Post a Comment